Hey there, Mac users! We’ve got some awesome tips and tricks to share with you that you probably didn’t know about. These are the kind of Mac OS hacks that will make you feel like a tech-savvy ninja. So, buckle up and get ready to learn some cool new tricks!
1. Take a screenshot of a specific area
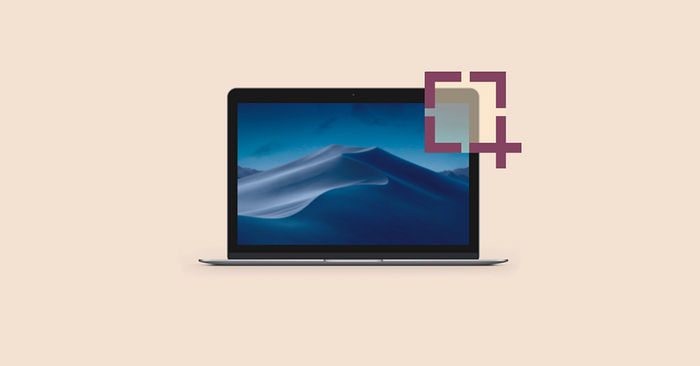
If you’re looking to capture a specific part of your screen, you’re in luck! There’s a simple and easy way to do it. All you need to do is hit the Command + Shift + 4 keys on your keyboard and then drag your cursor to select the specific area you want to screenshot.
This feature is incredibly useful if you need to take screenshots for work or for personal reasons. For example, if you’re working on a project and need to take a screenshot of a specific chart or graph, this feature will allow you to do so easily and efficiently. Additionally, if you’re trying to troubleshoot a technical issue and need to show someone a screenshot of the problem, this feature will make the process much smoother.
So don’t hesitate to use this nifty feature next time you need to take a screenshot — it’s like magic!
2. Quickly access your Downloads folder

Do you find yourself constantly downloading files and searching for them later? Or perhaps you’re someone who just wants to be more efficient and save time when accessing files. Regardless, there’s a simple solution that can help you achieve your goal.
By pressing Command + Option + L, you can quickly and easily access your Downloads folder without having to navigate through multiple folders.
This can be especially useful if you frequently download large files or need to access them quickly for work or personal reasons.
So why not give it a try and see how much time you can save with this handy shortcut?
3. Use Spotlight to do quick calculations
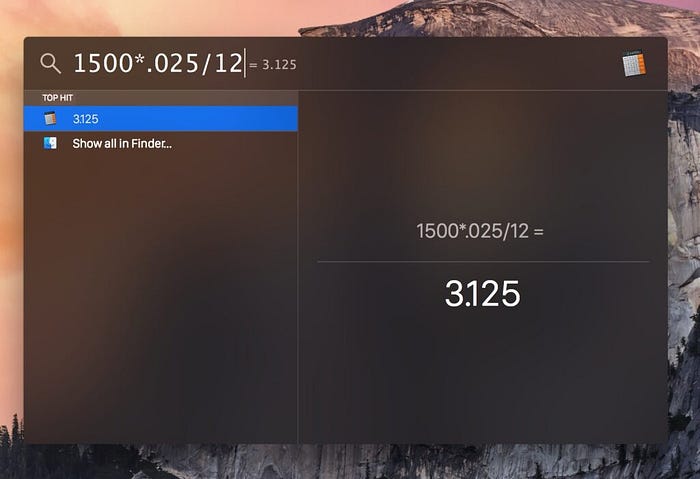
If you’re looking for a quick and easy way to do some simple math on your Mac, there’s no need to even open the Calculator app. Instead, you can use the built-in Spotlight feature to quickly access a calculator without interrupting your workflow. Simply press Command + Spacebar to open Spotlight, and then type in your math problem.
The answer will appear instantly, allowing you to continue working without any distractions or interruptions. This can be especially useful if you need to do a quick calculation while working on a project or browsing the web, and don’t want to take the time to switch to a separate app.
So next time you need to do some math on your Mac, remember that the Calculator app isn’t the only option. Spotlight can help you get the job done quickly and easily, without any extra hassle or fuss.
4. Customize the Dock

Do you find yourself struggling to navigate through a cluttered Dock filled with apps that you hardly ever use? If so, it may be time to do some spring cleaning and streamline your Dock.
To start, right-click on an app in the Dock and select Options. From there, choose Keep in Dock. This will allow you to keep only the apps that you use most frequently, making it easier to quickly access them whenever you need to.
By regularly revisiting your Dock and removing any unnecessary apps, you can not only improve your productivity but also reduce any potential distractions that might be slowing you down. So why not take a few minutes to clean up your Dock today and see how it can help you stay focused and efficient throughout the day?
5. Use Split View to work with two apps at once
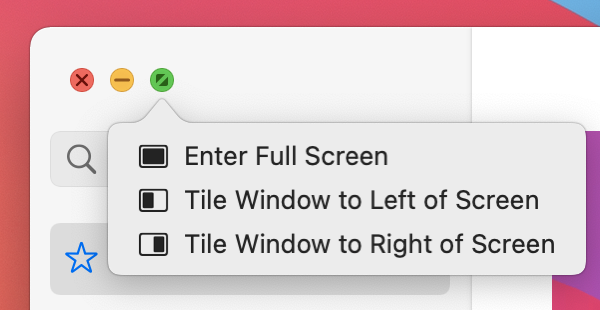
Multitasking can be crucial when it comes to productivity. In fact, working with two apps simultaneously can be an efficient way to get more done.
Luckily, there is a feature called Split View that allows you to do just that. By clicking and holding on the green full-screen button in the top-left corner of an app window, you’ll be able to activate Split View and drag the app to either the left or right side of the screen.
This way, you can have one app open on one side and another app open on the other, making it easier to work on both tasks at once. This can be particularly helpful when you need to reference information from one app while working on another task in a separate app.
So if you’re looking to increase your productivity and take on multiple tasks at once, be sure to take advantage of the Split View feature on your device!
6. Use the dictation feature
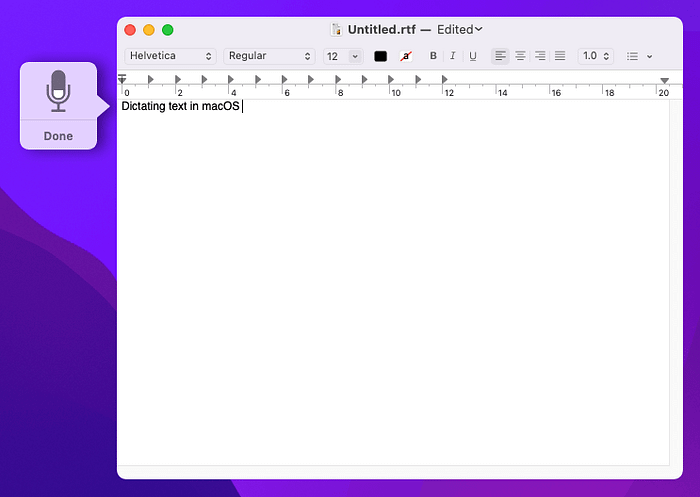
When it comes to typing, it’s not always easy to keep up with your thoughts. Sometimes it’s just easier to speak out loud and let someone else do the typing for you.
Luckily, most devices today come equipped with a dictation feature that allows you to use your voice to type instead. This is particularly useful when you’re feeling too lazy to type or when you need to take a break from typing to rest your hands.
To use the dictation feature, simply press the Fn key twice to start dictation, and then begin speaking. Think of it as Siri for your keyboard — it will listen to your words and accurately transcribe them onto the screen.
So next time you’re feeling too lazy to type, give your fingers a break and try out the dictation feature instead!
7. Use AirDrop to share files with nearby devices

AirDrop is a great feature that allows you to effortlessly share files between devices. The process is really simple and straightforward, making it an excellent option for those who need to transfer files on a regular basis.
To get started, simply open AirDrop in Finder. Once it’s open, you can easily drag and drop the file you want to share onto the device you want to share it with. This will initiate the transfer process, which should only take a few seconds.
One of the best things about AirDrop is that it works with a wide range of file types, including documents, photos, videos, and more. This means that you can use it to share everything from work files to family photos with ease.
Overall, if you’re looking for a fast, reliable, and easy way to share files between devices, AirDrop is definitely worth checking out!
8. Use the Guest User account
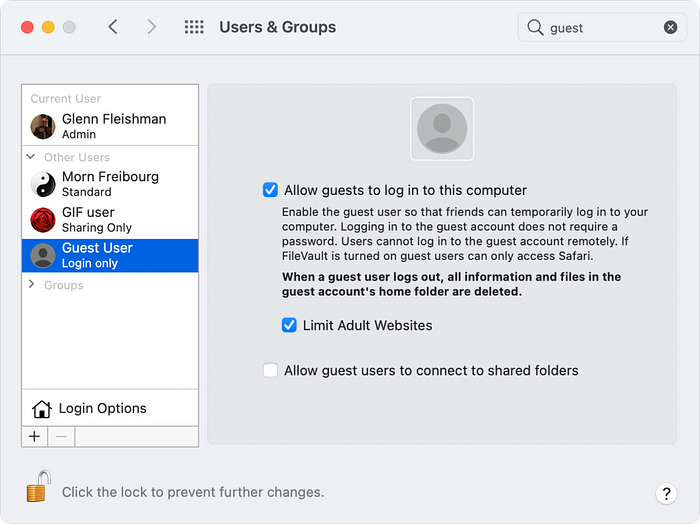
If you are the owner of a Mac computer and you need to lend it to someone else, you may want to consider using the Guest User account. This feature allows your guest to use the computer without having access to your personal files or settings. To setup a Guest account follow these steps:
- Click on the Apple menu and choose System Settings.
- Select Users & Groups.
- Guest User > Allow guests to log in to this computer.
- If you want to restrict access to adult websites, switch it on.
- If you want to allow guests to access shared folders, switch on Allow guest users to connect to shared folders.
- Quit System Settings.
The Guest User account is like a VIP pass to your Mac that keeps your personal data backstage while still allowing your guest to enjoy all the benefits of using the computer.
This way, you can be sure that your files and settings are safe and secure, while still being able to lend your computer to anyone who needs it.
9. Use Time Machine to back up your files

Backing up your files is crucial to ensure that you don’t lose any important data. Using Time Machine, a built-in backup feature on your Mac, you can easily and automatically save copies of all your files.
Simply connect an external hard drive to your Mac and turn on Time Machine in System Preferences. This will enable you to recover any lost or deleted files, even if you accidentally delete them.
Additionally, Time Machine allows you to browse through your backups and see how your files looked on a certain date, which can be useful if you need to recover an older version of a file.
Overall, using Time Machine is a simple and effective way to protect your important files and give you peace of mind.
10. Use Siri to control your Mac
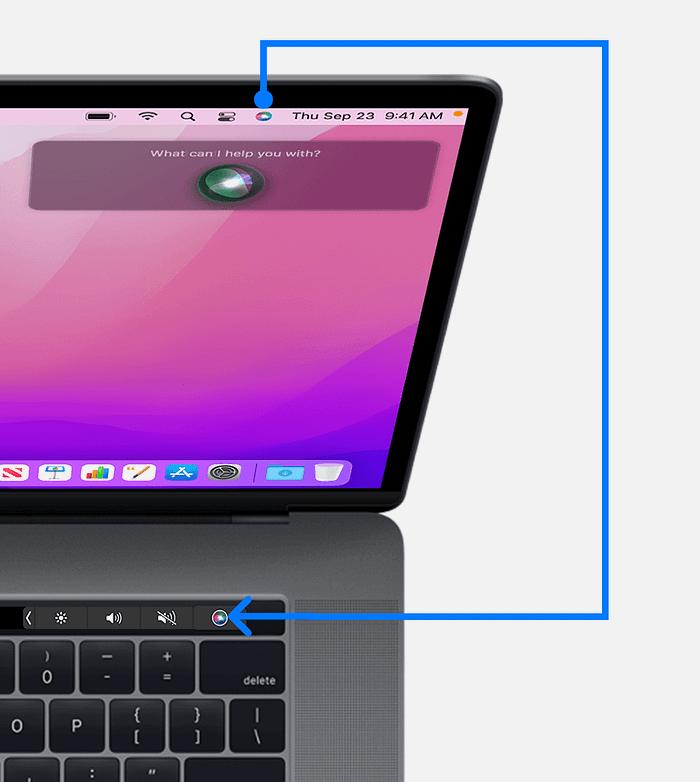
If you’re looking to boost your productivity, Siri can be a fantastic tool to help you get things done. With just a click on the Siri icon in the menu bar, you can command your computer to perform a variety of tasks, from setting reminders to answering your burning questions.
It’s like having an intelligent personal assistant right at your fingertips, ready to help you tackle whatever challenges come your way. So why not give Siri a try today and see just how much more productive you can be?
11. Use Night Shift to reduce eye strain
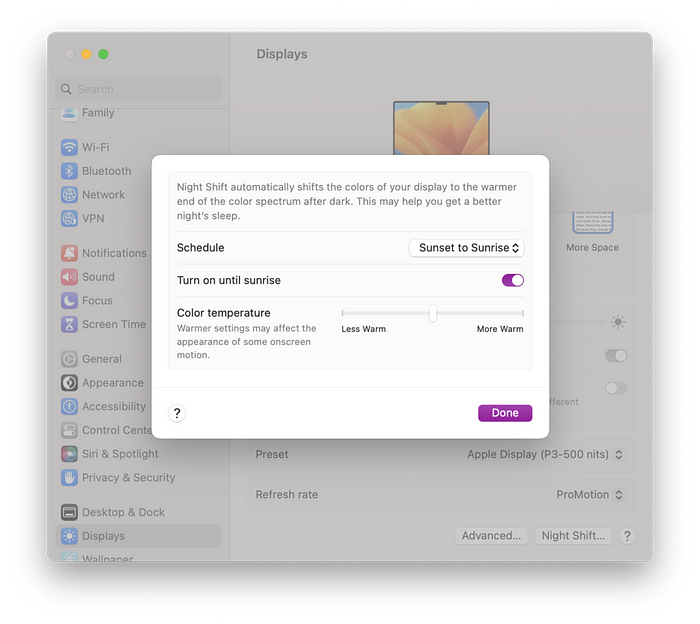
Looking at your screen all day can cause a lot of discomfort, especially if you’re working late into the night. This can lead to eye strain, which can be quite painful and can even affect your productivity.
Fortunately, there is a solution to this problem. You can use Night Shift, a feature that reduces the amount of blue light emitted by your Mac’s screen, which makes it much easier on your eyes.
You can easily enable this feature by going to System Preferences, clicking on Displays, and then selecting Night Shift. Once you’ve turned it on, you’ll immediately notice a difference in the color temperature of your screen, which should be much more comfortable to look at, especially in low-light conditions.
So don’t suffer from eye strain any longer, enable Night Shift today and start enjoying a more comfortable and productive computing experience!
12. Use the Handoff feature
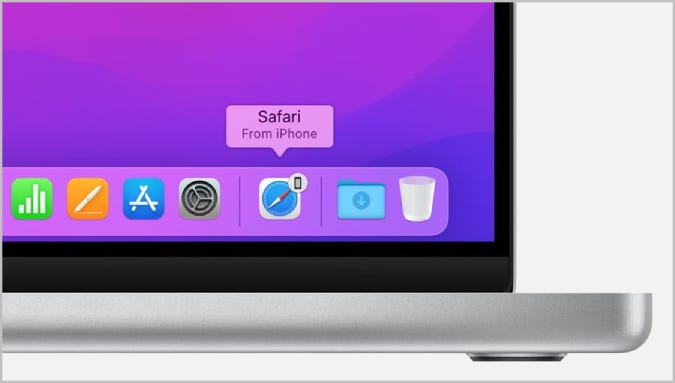
Handoff is a feature that allows you to switch between devices while working on a task. This means that you can start a task on one device and continue working on it on another device, without losing any progress. It’s a great way to stay productive, especially if you have multiple devices.
All you have to do is make sure that both devices are signed in to the same iCloud account. Once you’ve done that, you can start using Handoff to seamlessly switch between devices and continue working on your tasks with ease.
Whether you’re working on a document, a presentation, or any other type of task, Handoff makes it easy to stay productive and get things done. So why not give it a try and see how it can help you stay on top of your work?
13. Use the Emoji & Symbols feature

Do you want to add some personality to your writing? One easy way to do so is by using emojis! Luckily, there’s a built-in feature you can use to access a wide variety of emojis: the Emoji & Symbols window.
To open the window, simply press Control + Command + Spacebar. From there, you can browse through a vast selection of emojis and symbols to find the perfect addition to your text.
With this feature, you can easily add flair and fun to your writing, and make it stand out from the rest. So why not give it a try and see how it can enhance your writing today?
14. Use Quick Look to preview files
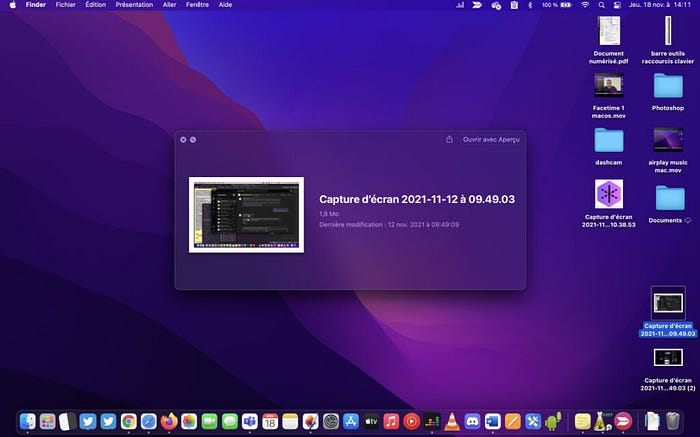
Did you know that there’s a way to preview files on your computer without even opening them? It’s called Quick Look, and it’s a super convenient feature that can save you a lot of time.
Whether you’re looking through a folder of images, videos, or documents, you can simply select the file you want to preview and press the spacebar.
This will give you a sneak peek of what’s inside, so you can quickly decide whether or not you need to open the file.
Plus, Quick Look is really easy to use, so you don’t have to worry about any complicated steps or settings. Give it a try next time you’re browsing through your files!
15. Use the keyboard shortcut for Force Quit
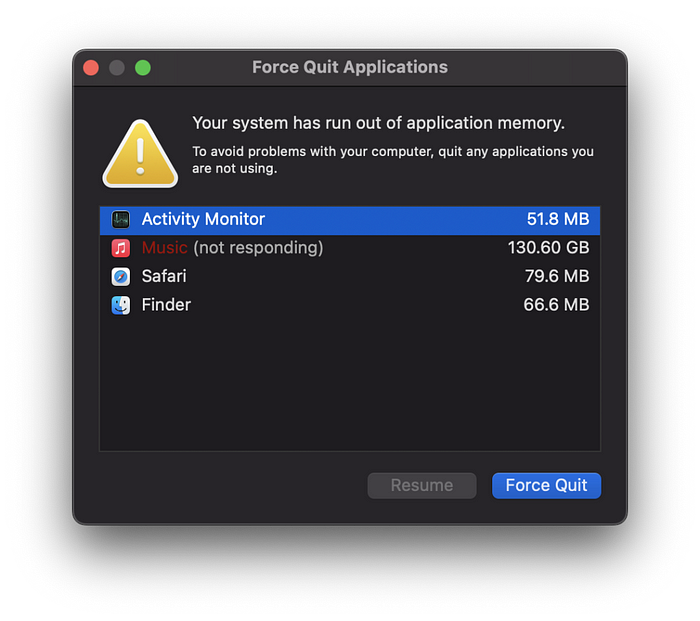
When an app is not responding, it can be frustrating to wait for it to start working again. However, there are some steps you can take to fix the issue. One option is to use the keyboard shortcut for Force Quit.
This shortcut can be accessed by pressing Command + Option + Esc. Once you have pressed these keys, you will be able to select the app that is causing trouble and then click Force Quit.
This will close the app, allowing you to reopen it and hopefully use it without any issues. Alternatively, you can try restarting your computer, which can sometimes help with app-related problems.
By following these steps, you can quickly and easily fix any issues you may be experiencing with your apps.
Verdict
These are just a few of the many Mac tips and tricks that can make your life easier and more productive. Try them out and see how they can change the way you use your Mac. And who knows, maybe you’ll discover some tricks of your own along the way.
Until next time, happy Mac hacking!


